
Casper Has Juice
It was one of those projects that is easily put off for years. You know the type. Once we returned from Pittsburgh National, I felt energized enough to finally take it on. You see Casper, our sleeper Ranchero, had some sort of electrical issue(s). Like most of us shade tree hobbyists, the fear of making things worse is a serious deterrent. After all, blowing out alternator fuse-links is something I’ve experienced multiple times, but that is another story or two. This article will cover the symptoms, research, preparation and finally garage tasks of my three-month electrical adventure with Casper.
Symptoms:
followers way back
I suspected there was a problem when most folks driving behind us seemed unwilling to approach closer than 10 car lengths. Sure, Casper looks like he has been in several wreaks, which is true. No one likes tailgaters but 10 car lengths is a bit much.
instantly popping fuses
Hoping for an easy fix, yeah right. The fuses were checked. You know, get into that yoga position with the bench seat still in place. Then look under the dash to the left of the steering column. Yep, one was blown. After an hour of confined space surgery, the fuse was replaced. Guess what, it instantly blew again. Now I knew it was not going to be quick fix. At this point the prime suspect was a short somewhere in the lighting circuits. Oh boy.
Prepare:
what electricity means to me
I have an amateur understanding of electricity and very little practical experience. Here is all I know on the subject. Don’t worry, this will not take long. Direct Current (DC) flows in one direction, amps can be considered the size of an electric pipe, volts are the standard which all devises on the circuit must conform and oms are the measure of resistance. Resistance is required, or you send maximum amps through the circuit, aka a short circuit. Automobile batteries are rated from 600 to 800 amps. Which are more amps than run many houses.
check in with Jerry
Knowing I was in over my head, checked in with our VP Jerry Kratz. He confirmed by fears. There are no usual suspects and no easy way to find a short.
internet search
Armed with a basic understand of “juice”, I pounded the internet for a few days to see where to go from here. At this point I suspected a short caused by a wire rubbing bare against some grounded part of the body/frame. A YouTube classic Ford channel I follow, Jeff Ford’s Autorestomod Manic Mechanic, recommends starting with the light farthest from the fuse box, passenger rear. Others recommend some sort of power-probe so not to send 600 amps down a circuit while testing. The best tool seems to be Power Probe ECT3000B Short/Open Circuit Finder. I tested a lesser expensive VDIAGTOOL V200 Pro Automotive Power Circuit Probe Tester Breaker Finder but ended up returning it. While it is an excellent power_circuit_probe, it could not directly detect shorts as the ECT3000 can. Instead decided to risk it with my old non-powered probe, a multi-meter and two 30-foot lengths of 18 gage wire. (PS: The internet searching led me to discover Angelina Jordan. An amazing kid.)
find electrical diagrams
Pulled these diagrams from the 1964 Falcon Shop Manual:
1964 Ford Wiring Diagram-Exterior Lighting
1964 Ford Wiring Diagram-Instrument Lights
1964 Ford Wiring Diagram-Interior Lighting
The color one is so detailed it can be hard to follow. I am thinking of getting a poster made of it to hang in my cave. The others are black and white but easier to follow.
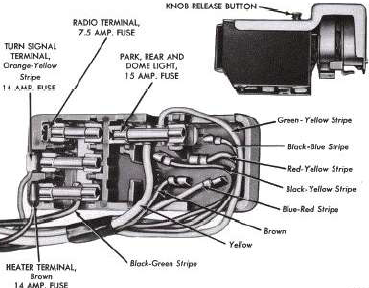
get fuse box diagram from shop manual
Made a copy of the fuse box diagram from the 1964 Falcon shop manual. This was referenced many, many times.
get multi-meter and two 30ft 18g wire with alligator clips on both ends
These items were also gathered from the garage. I just had to put the clips on the end of unopened wire packs. Used red for positive and black wire for direct connection to battery negative/ground.
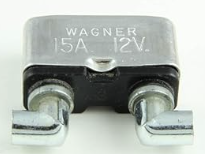
purchase 15amp tube circuit breaker
Who knew? There are circuit brakers that fit in the tube fuse slots in the fuse box. After blowing out several 15-amp tube fuses diagnosing, I invested in a breaker. Jerry advised using it only for testing, not permanent. https://www.amazon.com/dp/B00NVJ43EQ/ ) Not wanting any surprises I bench tested the breaker. It performed as advertised. When the breaker flips, it will reset only when the battery is disconnected then reconnected.
to power probe or not
As mentioned already, the vDiagTool claimed to find shorts. Turns out it is no better at finding shorts than a non-powered probe. It took at least half a dozen emails with their support before they admitted it will not directly find a short. It will trace a wire but will not tell you exactly where a short is located. On the other hand the ETC3000 will.
Tasks:
Okay, we are finally ready to do some diagnosis and repair.
remove bench seat
You would think removing the bench would be easy. It was, in my younger days. Just remove the four nuts under the vehicle that hold the seat to the floor. Then grab and lift out. Well at 69 years young, that “lift out” part does not happen anymore. After a few days of thought an EMT like stretcher was devised. Just two eight-foot 2x2s with holes for the above mentioned machine thread bench hold downs. With the help of a comealong, I was able to get the bench seat on the bench table. A bit over engineered but got the job done.
remove battery ground quick disconnect
Next an easy task. Remove the quick disconnect from the battery. You know, that aftermarket green knob on the ground post. Not really expecting this to be the root cause, but you never know. It was not the problem. Also did not want to worry about the knob’s contacts accidentally touching.
disconnect 4-way flasher
Some 50 years ago the prior owner installed four-way flashers. Maybe something aged in the guts causing the issue(s). Did not. Someday I’ll reconnect them. 😊
find parasitic draw
The YouTube RestoMod guy said to test for a parasitic draw by putting a non-powered probe inline between the battery ground post and the ground cable. To my surprise Casper did have a parasite. Now we are getting somewhere. After much trial and error, discovered the drain was due to the tachometer. The power wire was spliced into a constant hot when an accessories hot was expected. Who did that? Oh, that was me a few years. The timing was right but did not change the real issue(s).
disconnect fuse box from light knob
Now we are to one of the steps I’ve been dreading and trying to avoid. Even with the seat removed it is still a pain to view and replace one of two problem fuses. Looks like I will have to drop the fuse box with headlight switch from the dash. This will give “easy” access to the entire fuse box. Removing the assembly is not that hard. It is putting it back later that is rather frustrating. So off came the headlight knob and bezel. Plop, the fuse box is now dangling under the dash.
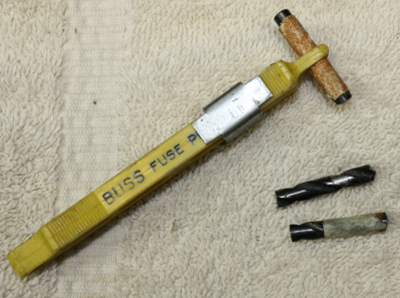
clean contacts
A several YouTubers suggested that after 60+ years it is a time to remove the tarnish from glass fuse contacts. They had several recommendations as to how to go about it. All seemed awkward and a bit destructive. I came up with what I consider a better way. If you are like me, you have many dozen if not hundreds of drill bits laying around. Sacrifice one that is a little smaller than ¼ inch. Cut it into lengths of 0.75, 1.0 and 1.25 inches. These are the lengths of the tube fuses. Wrap the three bit fragments with 120 grit sandpaper. Use your tube fuse installer tool to hold the sandpaper to the bits. Then just insert the bits into the fuse slots and twist away. Presto, the contacts are shiny clean as new. I can’t remember now if this stopped the fuses from blowing. In any case the brake and right front blinker and brake lights did not work. So, my quest continues.
replace brake pressure switch
After going cross eyed studying diagrams, the next task was to investigate the brake pressure switch attached to the master cylinder. With the switch still installed, I tested the two power posts for, you know, power. Both showed voltage even though the break peddle was not engaged. Humm. Disconnected the leads. One had juice, the other nothing as expected. Replaced the switch with a new one. Presto, brake lights are now working.
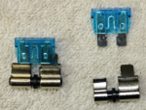
why use tube fuses
Somewhere along the way Casper’s fuses stopped popping. I think cleaning the fuse box contacts had something to do with it but can’t prove it. It is still possible to purchase glass fuses, but they are all 1.25” in length. In the “old” days tube fuses were different lengths based on amperage. Instead, I found tube-to-blade adapters in various lengths. Another RestoMod recommendation. Sure, they are a little pricy at five for $43 including shipping and tax but are a snap to remove and install. Also, blade fuses are easy to find and don’t cost anywhere as much as tube fuses.
Product Search – National Parts Depot -14A526-1D
rebuild front bumper lights
Alrighty, down to one issue. The front passenger blinker does not. The voltage to the light is as expected. Removed the light bucket from the bumper. The only way to remove the bulb was to mutilate it. Once removed, the bucket and socket were a rusty, corroded mess. I think we found a problem! I believe the corrosion was causing a short between the ground and power lead in the light socket. Now what? I am not about to pay north of $85 for a new bumper light housing. Instead, ordered up this mostly plastic bulb socket.
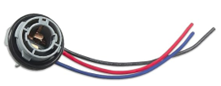
https://www.amazon.com/dp/B0CKLGP9FZ?th=1
Drilled out the original housing to accept the new socket. Easy enough if you drill the proper size. I did not. Put the housing back in the bumper with correct (well I think correct) wiring. Another round to light testing.
All good, hands up, high five, touchdown, mission accomplished!
LED lights
Here is a bonus for those that have are still with me. 😊 Even with everything now working, the lights are still as dim as ever. Why not try out LED 1157s? A guy we met in Pittsburgh said all you have to do is replace the bulbs with LED. So I did. The guy was wrong. After replacing all four bulbs, no blinkers. In any case, LEDs all around is a no go. Amy found an article that said in classic cars LEDs don’t provide enough resistance for the blinkers to blink. Thinking cap time. Let’s try standard bulbs in the front to supply resistance to the circuit. Still keep the LEDs in the tail for that afterburner effect. Yep, it seems to be working after a 20 mile test drive. Later discovered there are two recommended solutions. One, replace the original blinker relay with one designed to work with LEDs. I might have gone this route, and still may, except the relay is attached to the back of the gage cluster. I’ve been there and don’t want to do that do that again if not truly necessary. The other recommended option is to place special resistors in line near to each bulb. The downside here is the resistors get hot to the point they could melt wire coating and should be installed on a heatsink of some sort. Sounds like trouble waiting to happen. In my case, keeping “stock” bulbs up front and LEDs on the back side does the trick for now. Amazon.com: AUXITO 1157 LED Bulb
Conclusion:
After all that, there are four things you should consider for your Falcon. Check for parasitic electrical draw. Second, clean fuse box contacts at least once every 10 years. Some say two years … yeah right. If brake lights don’t, confirm the pressure switch is working. Finally, for some unknow reason the front passenger bumper light bucket can corrode badly. I suspect it takes the brunt of puddle splashes. After dealing with Casper, I checked our other 64 Ranchero, Speedy. While the lights all worked, I could not remove the front passenger side bulb. Turns out it was likely to develop the same short, shortly. That’s all folks. Hope to see you down the road.
The Ogram gang; Jim, Amy, Casper and Speedy
Jim.Ogram@FordFalcon.org